This document:
In its prototypical application, qenqote accepts URL's that have been copied or cut to the clipboard from a browser bar. Qenqote applies a user-selected quoting function, and writes the result back to the clipboard.
Example 1: User selects URL "http://en.wiktionary.org/wiki/items" and then clicks a button on a qenqote menu, putting URL into form (e.g.) "[Items](http://en.wiktionary.org/wiki/items)" as needed for english.stackexchange.com answer boxes. Results can be pasted into the answer box to make a clickable link without further manual editing.
Example 2: User selects text "http://stuff/b=1&r=mimic&send=Look+it+up" and clicks "dico Synonyms URL" button, which sets clipboard to "*mimic* [synonyms]("http://stuff/b=1&r=mimic&send=Look+it+up") include". Pasted into a web forum document, this will make phrase "mimic synonyms include", that is, mimic will be italicized and synonyms will be highlighted to show it is a clickable link.
In other applications, qenqote can be given a variable name from which it produces text of a "for (...) { }" or "while (...) { }" structure; can produce formatted dates or strings according to clipboard and other data; can put HTML tags around clipped text; can apply regular-expression substitutions to text; and can output any simple function one cares to program.
To try out examples mentioned above, obtain files qenqote, qset-qenqote.xml, qset-demo.xml, and qset-html.xml. If all the files are in the current working directory, start the program via ./qenqote or ./qenqote qset-qenqote.xml or ./qenqote qset-demo.xml, etc. By default, the first form shown ("./qenqote") looks in the current directory for file qset-qenqote.xml. In the other forms, you can specify a qualified path to the setup file. You may wish to run the program in the background; to do so on Unix systems, add an ampersand (&) at the end of the command. On non-Unix systems, you may need to adapt the first line of the program, or invoke the program with python qenqote.
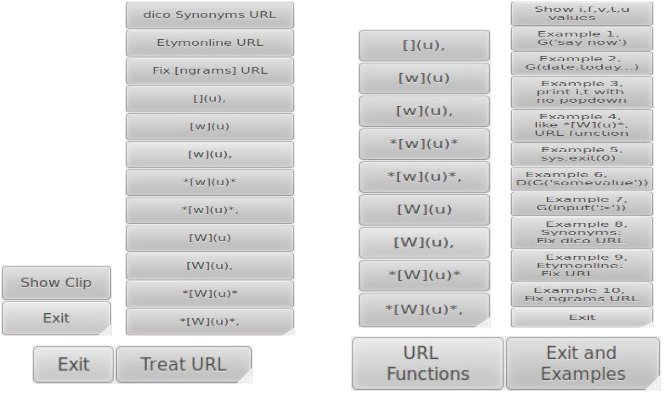
When you run the program using its default script qset-qenqote.xml, a small menu with two buttons should appear near the lower left corner of the screen, at location specified in the script. Move the mouse cursor onto the menu; a submenu should pop up, changing to a different submenu if you move the mouse pointer from one button to the other. Screen captures for the menu and popup submenus of qset-qenqote.xml are shown at left below and for qset-demo.xml at right. (Some text was mis-formed during image processing.)
Select some text before popping up a submenu, and when the submenu appears, click a button on it. This will put a new, transformed value onto the clipboard and will close the submenu. To look at the new text, either paste it someplace, or click a "Show Clip" or "Show Values" button on the Exit submenu. "Show Clip" will print clipboard text in the terminal where qenqote started. "Show Values" will display some other values as well. (A later version may use a text box for display.)
<line> <key>aButtonName</key> <def>somePythonCode</def> </line>
If you are familiar with writing Python code, you probably can copy and adapt an existing qenqote setup file for your own purposes without reading the Details section. The rest of this section is an overview of how qenqote works and provides the basic level of understanding needed for customizing qenqote setup files.
A qenqote script, or setup file, contains names of buttons, code snippets to implement button functions, and mode settings. Modes determine menu layout and specify operational aspects like click to operate, enter to operate, and leave to operate. By its nesting order, a script specifies which menu or submenu each button belongs to.
Each code snippet executes when its portion of the menu operates.
Top level code (i.e. code defined by those <def>
pairs outside of any <main> pairs) executes at startup,
before any menu is displayed. <main> level code executes
when its main menu button operates. <line> level code
executes when its submenu button operates. Some scripts contain no
top or intermediate level code, leaving all the work for bottom
level code to do. Others have code at multiple
levels. In Example 1, the first two <def> lines are
top level code, and the others are submenu level.
Example 1:
<qenqote>
  <def>def C(x): subprocess.call(['firefox',x])</def>
  <def>def T(x,y): C('http://%s%s' % (x,y))</def>
  <main><key>Call-Demo</key>
    <line><key>Wiktionary</key><def>T('en.wiktionary.org/wiki/',qi)</def></line>
    <line><key>Wikipedia</key><def>T('en.wikipedia.org/wiki/',qi) </def></line>
    <line><key>To German</key><def>T('dictionary.reverso.net/english-german/',qi)</def></line>
    <line><key>Exit</key><def>sys.exit(0)</def></line>
  </main>
</qenqote>
The above code is part of file qset-call.xml. When
you run it (via, e.g. qenqote qset-call.xml),
functions C(x) and T(x,y) are immediately defined by
def C(x): and def T(x,y): snippets. They are defined in
the same namespace that will be used later when executing
submenu-button code.
When you click Example 1's Call-Demo button, qenqote will pop up a menu with names Wiktionary, Wikipedia, To German, Exit, and half a dozen buttons described later. If you then click the Wikipedia button, qenqote will execute code T('en.wikipedia.org/wiki/',i), which in turn will create a URL and call C() with it.
When a submenu button operates, clipboard text is delivered to the button's code in variable qi, with modified forms supplied in other variables qf,qv,qt,qu (see Standard Conversions below). To put text on the clipboard, user code should compute a result x and say qput(x), as illustrated in this example:
<def>qput('Simon says "%s".' % qi)</def>
If the clip is Stand up straight when this code runs,
the qput() call will put result Simon says "Stand up
straight". back on the clipboard. On the other hand, the code
in Example 1 doesn't call qput(), so it doesn't change
clipboard contents.
Name	  Usage     Notes

qi	  input  (Copied from primary clipboard content)
qf	  front	 (the part of i before last /, if any, else i)
qv	  value  (the part of i after last /, if any, else i)
qt	  tail	 (v with each non-letter sequence converted to a space)
qu	  upper	 (t with first letter uppercased)
qi    http://en.wiktionary.org/wiki/coupon
qf    http://en.wiktionary.org
qv    coupon
qt    coupon
qu    Coupon

qi    Random+entry+/+**+by&-&language)
qf    Random+entry+)
qv    +**+by&-&language)
qt     by language
qu     by language

qi    http://stackoverflow.com/questions/4068785/python-nameerror-global-name-foobar-is-not-defined
qf    http://stackoverflow.com/questions/4068785
qv    python-nameerror-global-name-foobar-is-not-defined
qt    python nameerror global name foobar is not defined
qu    Python nameerror global name foobar is not defined
During startup, qenqote imports modules datetime, re, subprocess, and sys into the user-execution namespace. Note that code snippets in qenqote scripts can also import modules. It is common sense to do such imports in top-level <def>s rather than button-level. It also makes sense to put lengthy or frequently re-used code into modules that you then can import into qenqote scripts. The Python modules tutorial tells how to do so.
In v0 qenqote, user variables and functions defined outside function scope can be accessed in other user code and functions. However, apparently due to binding issues global apparently does not function in user code. Thus, qini(), for example, returns its results as a tuple, instead of as global variables. This issue may be resolved in a future release.
If you prefer modules other than datetime, re, subprocess, and sys to be automatically available to user code, edit the line after # Initialize userspace near the end of qenqote. If you have well-debugged code being used in many scripts, you may wish to modify qenqote to import your code, in the same way that qenqote imports qput, qini, qwin, qese, qSetClippy from qenqoteUserInit.py.
The initialization just mentioned makes four functions available to in user-defined code:
User code for text-transformation submenu buttons should compute a
value and use function qput(s) to copy it to clipboard.
When qput(s) is called, it tests if s is a non-empty string; if
so, it copies s to the primary clipboard. Note, it uses
variables qClippy and qResult in user space:
qini() computes qi,qf,qv,qt,qu values. Previous
sections Standard Conversions and
Examples of standard conversions provide examples
of qf,qv,qt,qu computed from qi. In detail, qi is obtained by reading text from the primary
system clipboard; (qf,s,qv)=qi.rpartition('/') is used to
produce qf and qv from qi; then qt =
re.sub(r'\W\W*',' ', qv) gives qt by removing strings
of non-letters from qv; and finally qu is obtained
by qu=qt.capitalize().
qwin(n) displays some data for script debugging.
      def qput(s):
          global qResult
          if s and isinstance(s,str):
              qClippy.set_text(s);
              qResult = s
qini(i,f)
qwin(n)
Note, one can control trace-printing of executed snippets via
statements qTrace=1 (on) and qTrace=0 (off) in user
code. Run the qset-call.xml script to see trace examples.
That script pops up the buttons mentioned in Example
1, plus buttons labeled Honary, Monary, Nonary, Trace On,
Trace Off, and Trace. The first three of these exercise
some ways of constructing and printing strings; the latter three
turn qTrace on or off and display it. A trace example:
        5. qExec:  (qi,qf,qv,qt,qu)=qini()
        6. qExec:  blob=2
        7. qExec:  qput('somevalue c');qwin(4)
[q Globals data printed here]
8. qExec: (qi,qf,qv,qt,qu)=qini()
9. qExec: blob=2
10. qExec: exec(qi)
This trace was a consequence of buttons 7c, 6, and 7c
of example code.
qese(w,s,c) calls qput(o) with a transformed
value o of the input, as suggested in the following table.
These values are useful for pasting into answers on
http://english.stackexchange.com.
qese(w,s,c)
           w    s    c  qese(w,s,c) result

          'x'  'o'  'c'   [](qi),
          'o'  'o'  'o'   [qt](qi)
          'o'  'o'  'c'   [qt](qi),
          'o'  's'  'o'   *[qt](qi)*
          'o'  's'  'c'   *[qt](qi)*,
          'W'  'o'  'o'   [qu](qi)
          'W'  'o'  'c'   [qu](qi),
          'W'  's'  'o'   *[qu](qi)*
          'W'  's'  'c'   *[qu](qi)*,
Example: In a previous example, we had:
qi=http://en.wiktionary.org/wiki/coupon, qf=http://en.wiktionary.org,
qv=coupon, qt=coupon, qu=Coupon. With these
values, qese('o','s','c') produces
qput('*[coupon](http://en.wiktionary.org/wiki/coupon)*,') via
its *[qt](qi)*, pattern.
Further examples of user code
      1. <def>qput('say now')</def>
      2. <def>qput(datetime.date.today().isoformat())</def>
      3. <def>print "qi=%s, qt=%s" % (qi,qt)</def>
      4. <def>qese('W','i','c')</def>
      5. <def>sys.exit(0)</def>
      6. <def>qput('somevalue 6');qwin(4)</def>
      7. <def>exec(qi)</def>
Example 1 copies "say now" to clipboard.
Example 2 sets clipboard equal to current date, in format
"yyyy-mm-dd".
Example 3 prints values of qi and qt, without changing clipboard
contents.
Example 4 applies function qese() to arguments 'W','i','c' and
global variables qi,qf,qv,qt,qu. When qi is
"http://en.wiktionary.org/wiki/items", for example, qese() invokes
qput() with "*[Items](http://en.wiktionary.org/wiki/items)*, ".
Example 5 causes the qenqote program to exit.
Example 6 copies "somevalue 6" to clipboard and also prints the
values of user globals whose names start with q.
Example 7 executes code from the clipboard. For example, if you
select qTrace=1 and click the exec(qi) button in
script qset-demo.xml, some qenqote execution tracing will be
turned on. Or, if you select sys.exit(0) and click that
button, qenqote will exit. Note, whenever an exec() execution
error occurs, qenqote reports it and continues.
Examples similar to the above appear in script qset-demo.xml.
As mentioned before, qenqote uses exec() statements to execute user code obtained from <def>...</def> entries in the setup file. In python, optional parameters to exec() allow user code to be executed in constructed local/global environments. qenqote builds an environment containing functions qput, qini, qwin, qese, qSetClippy described in Libraries and Functions... and variables qi,qf,qv,qt,qu described in Examples of standard conversions .
<qenqote>
  <at> ... </at>
  <def> ... </def>
  <mode> ... </mode>
  <main>
    <at> ... </at>
    <def> ... </def>
    <mode> ... </mode>
    <key> ... </key>
    <line>
      <mode> ... </mode>
      <key> ... </key>
      <def> ... </def>
    </line>
(additional <at>, <line>, <mode> structures for current main button)
  </main>
(additional <at>, <main>, <mode> structures as desired)
</qenqote>
XML comment sequences (i.e. <!--, ... -->) can
be included as desired (if no -- appears in the
comment). Several tag sequences in the above are optional; that is, default values will apply when <at>, <mode>, <key>, or <def> sequences do not appear. When some tag sequence appears multiple times at a given level, the effect depends on the tag and context, as noted in the following subsections, which also present examples and details.
Only the last <at> at a given level takes effect. A top-level <at> specifies main-menu geometry; a second-level <at> specifies submenu geometry for the main-menu button currently being defined.
Each <at> sequence that is specified should be a string with no spaces in it, giving a valid window-location and -size setting. For example, the sequence<pre>
<qenqote>
<at>150x300+20-20</at>
<main>
<at>120x300+180-20</at>
<key>lowercase</key>
...
</pre>
on the X Windows System first specifies that the initial
menu window will be 150x300 pixels, located 20 pixels from left edge,
and 20 pixels from bottom of screen. It then specifies that the first
button in that window (labeled "lowercase") will have a submenu that
is 120x300 pixels in size, located 180 pixels from left edge, and 20
pixels from bottom of screen.
<main><def>A()</def><line>...</line><def>B()</def></main>code bits A() and B() both execute when the button they are in operates. <def> strings may contain line breaks and must be formatted in accord with python language conventions, except that < and & characters within code must be written XML-style, as < and &.
As an example of use of the just-mentioned character conversions, consider
<def>qput('<b>%s</b>' % i)</def>
Using python's % operator, the above code will substitute the
value of i in place of %s and put the new string on the
clipboard. Thus, it will surround a clip by <b>
and </b> markers. For example, if this is a bold
step is on the clipboard, the result is <b>this is a bold
step</b>
As a second example of character conversions, the qenqote script qset-html.xml contains the line, <line><key>Fix <,&</key><def>qput(re.sub('<','&lt;',re.sub('&','&amp;',qi)))</def></line>, which corresponds to python statement <line><key>Fix <,&</key><def>qput(re.sub('<','<',re.sub('&','&',qi)))</def></line> to convert < and & characters in any clip presented to it.
Each <mode> sequence contains a string used to set appearance, behavior, and layout of menus and submenus on one level.
If undecorated entry-operated horizontal main menus and
click-operated vertical submenus will meet your needs, just use the
following three mode lines near the beginning of each script, and skip
reading the rest of this section.
       <mode> 1: HBox OnTop </mode>
       <mode> 2: VBox Enter OnTop </mode>
       <mode> 3: Click </mode>
If you want decorations on the windows (that is, window-manager frames
that allow easy moving or resizing of windows) add option
code Deco to the first or second of these, to control
decoration of the main menu or submenus, respectively.
Here is what three mode lines shown above do: (1) The first turns on HBox and OnTop options, to control the layout and ontop-ness of the main menu. HBox will be on by default, so is specified just for clarity. HBox at level 1 tells qenqote to use horizontal-fill for the windows it creates at the top level. (2) The second applies within the main menu buttons. It says they shall operate when the mouse pointer enters, and their submenus shall be vertically packed. (With multiple level 2 modestrings, one can make different packing and operation choices per button.) (3) The third applies within submenu buttons. It says they shall operate when clicked. In this example, there is no need to specify HBox or VBox at the third level. (Again, if different packing and operation choices are desired per button, different level 3 modestrings would be used, before and after each different set.) See [future] file qset-mode-de.xml for further details of ordering <mode> settings to get different button operation settings.
A <mode> string may contain any flat text that is XML compatible. Codes shown in the following table are recognized when options are being set. Non-matching text is ignored. Codes do not require space separators and will be recognized when embedded in strings. Spelling of option names is significant but capitalization is not. Thus, 'NoStick' is equal to 'nostick' and 'NOsTicK' etc., and 'LeaVenteR' matches both 'Leave' and 'Enter'. For ease of reading the table, some options are shown using capital letters.
Def.  Option   Opposite    Effect

      1...9              Level that this mode setting applies to
 *    HBox     VBox      HBox = Fill menu (or submenu) horizontally.
      VBox     HBox      VBox = Fill menu (or submenu) vertically.
      Enter    noEnter   Buttons operate when cursor enters
 *    Click    noClick   Buttons operate by clicking
      Leave    noLeave   Buttons operate when cursor exits
      Deco     noDeco    window decorations (frame around window)
      Stick    noStick   Sticky (visible in all workspaces)
      OnTop    noOnTop   "Keep-Above" (stays above non-above windows)
Most options controlled by a <mode> string have two possible
values, On or Off. For example, if string 'PQR' selects
an option's On value, then 'noPQR' selects its Off
value. When an option and its "no" form both appear in the
same <mode> string, the "no" form prevails; similarly, box
directions prevail in the order HBox < noHBox < VBox < noVBox.
Mode processing ensures that exactly one of HBox or VBox is set, but
does not check other options. In particular, if you turn off
all of Click, Enter, and Leave for a button, that button won't
operate. By default, HBox and Click are turned on for all levels, and
all other options off: menus default to undecorated.
<mode> settings do not respect nesting. Each <mode> affects a single level. A <mode>'s level equals the highest digit that appears in mode text, or current level if there are no digits. The effect of a <mode> carries forward from its appearance until end-of-script, or until another <mode> sequence appears for the same level. When qenqote processes a <mode>modestring</mode> sequence, it first sets Level, based on current level or on any digits in modestring. Then it sets the Level's options to baseline default values (HBox and Click). Then for each option in order shown it searches first for a turn-on and then for a turn-off. This is how it happens that the "no" forms of options prevail, and that the Box precedence order is HBox < noHBox < VBox < noVBox
As noted above, <mode> strings should contain XML-compatible text. This may include brief comments that contain no tags. For longer comments use <!--...--> XML comments. (But avoid "--" in the latter; unlike in HTML, a -- within an XML comment ends it.)
Demonstration menu qset-mode-de.xml with further details of ordering <mode> settings to get different button operation settings is partly done and is not included in v0 release. Half-baked version qset-mode-eg.xml is included.
Demonstration menus for the following are planned but not yet started:
If Click and Enter are on at the same time for a button, it will have already operated before you can click it. If Click and Leave are on at the same time for a button, either clicking the button or leaving it will operate the button.